
Here's something I made on a lazy sunday afternoon. I was going to throw it in the recycle bin, but figured you candy lovin' bunch may want a bite.
I was simply messing around in Photoshop yesterday with this. It wasn't intended as a freebie resource (and probably isn't good enough to be one), however, I figured some may find it useful to dig into.
There are a plethora of ways to make 3D text in Photoshop. You can use Photoshop's now rather powerful 3D tools, clever layer styles or smart objects that layer over the top of one another.
In this PSD I've used the third option: smart objects. Using smart objects for 3D effects does make it slightly more difficult to transfer elements between projects, but they can yield deeper and more realistic 3D effects.
Some of you may notice the background of this PSD has been made using our folded paper textures and halftone dot patterns.
Other Resources You Might Like:
- Gold 3D Lettering Pack
- Free Retro Text Styles for Photoshop
- Camouflage Patterns for Photoshop
- 3D Neon Lettering Kit Photoshop
- Free 3D Wooden Lettering PNGs
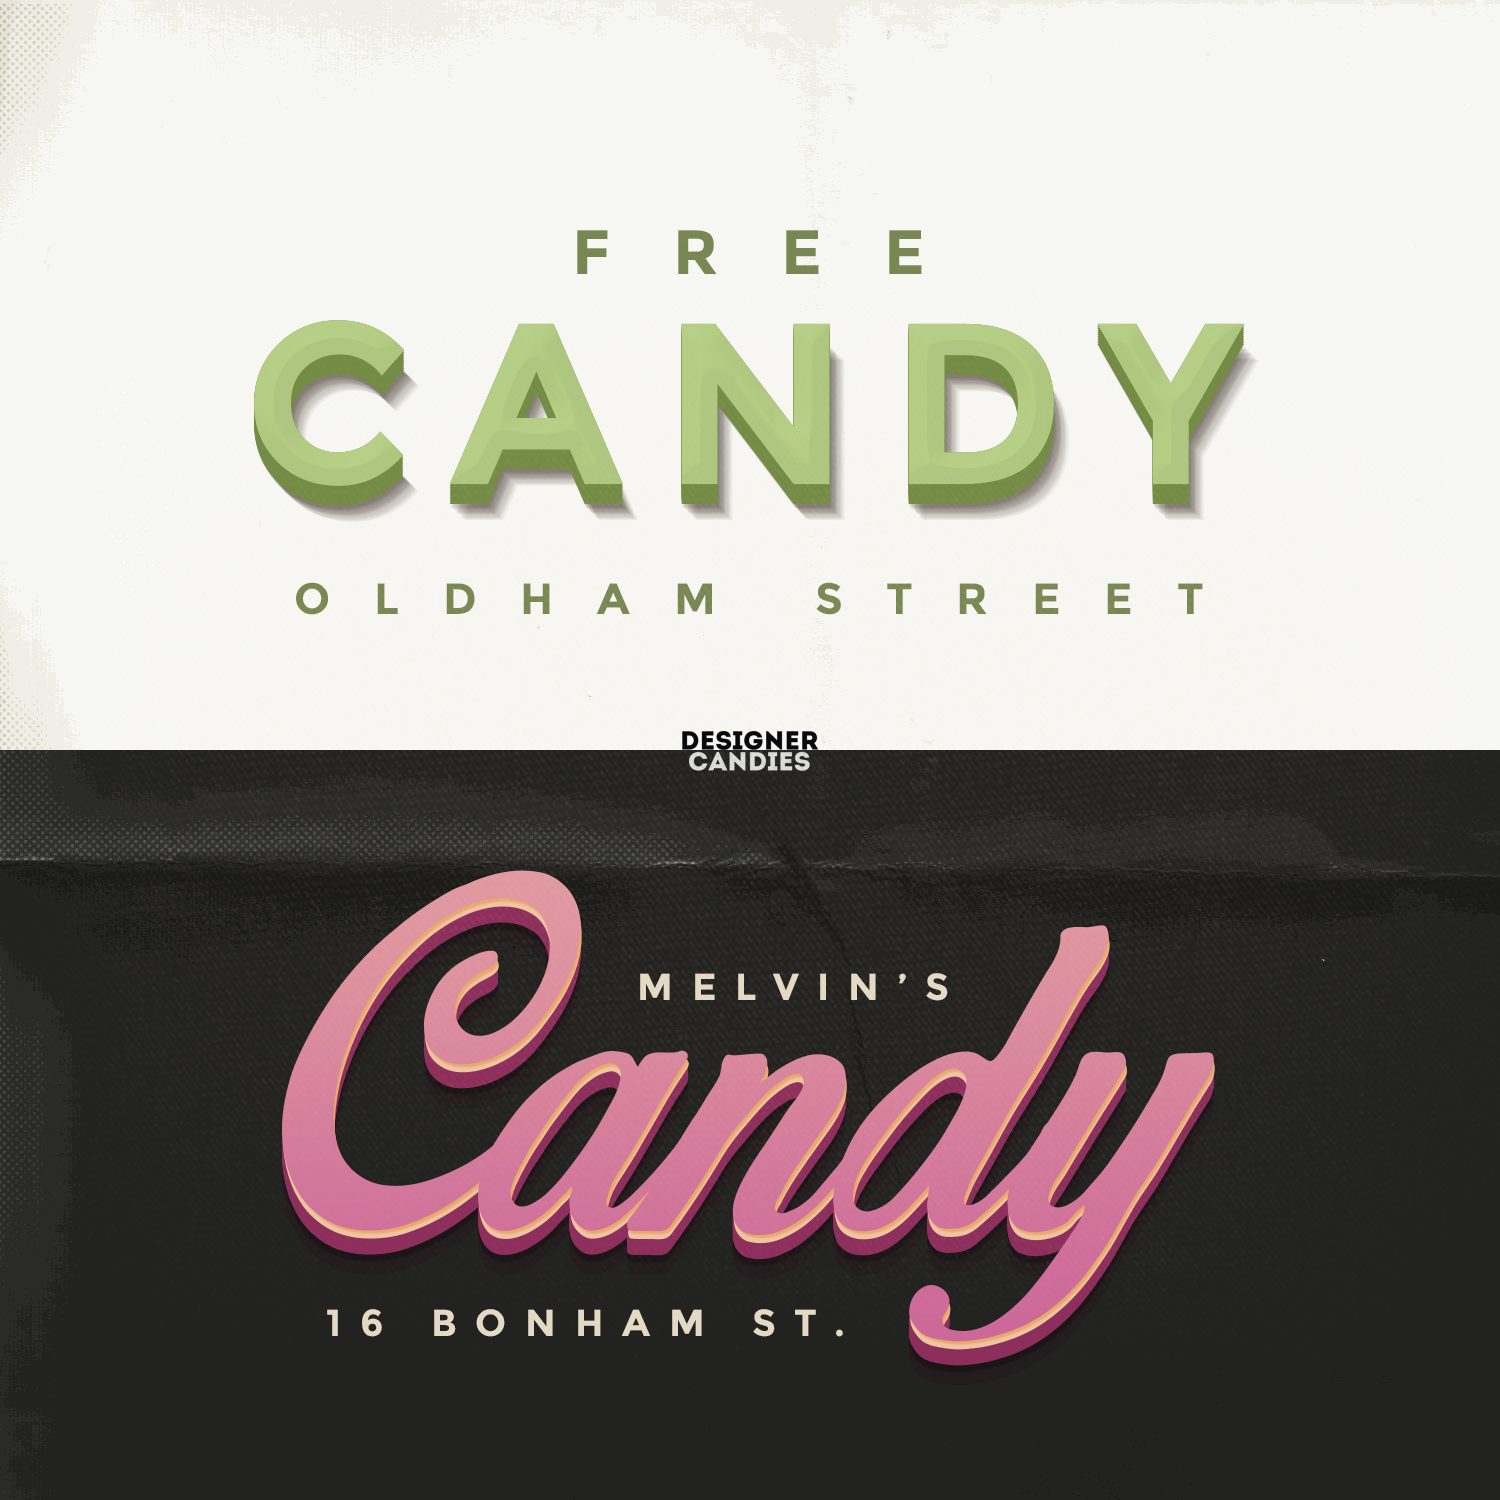
There are 2 different 3D text styles in this PSD, each with a flat-ish retro-ish appearance to them.
You will need two fonts for this file:
How to use this freebie (and edit a Smart Object):
First, make sure you have installed the fonts I have just mentioned and linked you to above.
Ok, the text in this PSD is made from Smart objects and some of you may not know how to use Smart Objects.
The reason I am sharing this PSD is not because of the quality of the asset (because it isn't really), but so newbies can dig into the smart object layers and see how the effect is made.
So, to edit the text –
- Open up the PSD in Photoshop and find the layers called “Edit me”. I've marked them in green. You'll need to open up the layer folders to find them.
- You'll notice there is a little icon on the thumbnail of the “Edit me” layers. That's because they're a Smart Object layer. Smart objects are often linked to multiple other smart object layers, so when you edit one, they will all update.
- Double click on the little icon you see on the layer thumbnail, OR right-click on the “Edit me” layer and select “Edit Contents”.
- A new window will open containing editable text. In this new window, change the text to whatever you want. Make sure your text fits inside the canvas or it will look strange when complete.
- Once you have changed the text, hit save. You can do this by going to File ›› Save, or by clicking Cntrl+S
(Cmd+S for Mac). - Once saved, close the window. You'll now see that the 3D text has changed to the text you entered in the Smart object window! Wahoo!
Free 3D Text PSD Preview:


77 comments
i don’t see any edit here tags or folders in this file is this the right file
They are Smart Object layers. Right click the layers I’ve highlighted and select “Edit Contents”
A new window will open. In this window you can edit the text.
Once you’ve edited the text, click save and close the window.
The changes you made will appear in the main document 🙂
I got it thanks…Are you with the flyer hero?
Yup, that’s me 🙂
I’m only a beginner and still using GIMP, so there are a lot of things that say photoshop can they also be use on GIMP? Thank you.
I’m not sure. This PSD uses Smart Objects, which I would assume is not compatible with Gimp.
Yes you are right ppyli, If possible then check this http://goo.gl/UdJcq6
Hey Adam, what’s the script font you used in the pink example?
Thank you, Adam! Very cool!
V cool thanks.
Thanks for the great share
Blessings Janet
You’re welcome!
Hi Adam,
I’m a beginner and I use the web-App Pixlr Editor (https://pixlr.com/editor),
it works with Layers and can also work with most PSD-files…
Is “Smart Objects” only compatible with Photoshop??
Thank you
I would assume that Smart Objects are a Photoshop-thang
Awesome Freebie! I am following!!! 😀
hguhf
thanks
nice job
Adam thank you for your valuable share.
You’re very welcome @angelinaveronica:disqus – don’t forget to check out the new text PSD I posted yesterday 🙂
Hi Adam. Appreciate your work. One question – in the section of “Candy” >Shadow I notice multiple shadow layers which seem to have no effect apart from the 1st one above. Are they really necessary? I tried to hide them and it seems to do nothing. Thanks
Fabulous text effect !! Thank you so much…by any chance you have online tutorials ??
Creative 3d. I download 2 and try to implement.
I love freebies. Thanks for sharing the PSD file.
I love 3D text. Thanks for sharing the eye-catchy 3D text PSD resource.
Thanks a lot. U r very welcome.
thanks a lot for the file.
I like to use freebies, and i got it. I read your article carefully. Great share. Thank you for sharing.
The Way to making 3D text in Photoshop, you show a fantastic method. I also like to use freebies. Nice post.
Hello,
Adam McIntyre
Actually I have learned new thing about 3D text software, already I download it and finally I will try
Thanks for your great post, keep it up. Thanks
Thanks for your good tutorial.We are very happy for your assist
good tutorial
well unfortunaley i cant download i did the email subscribption with 2 of my emails 🙁
Check your spam 🙂
Informative and helpful article thanks for share
Hello ,
This is an excellent post . You have a great thanks for this . Keep up it .
I have found lots of and helpful Psd text here. So I will give you thanks and best of luck.
Beautiful!, i’ve featured on Designr Kit: http://designrkit.com/editable-free-3d-text-psd/
Cool stuff with great share, thx!
unable to download
can anyone send me the file? @ smithadamari@gmail.com
Your PSD files are working so nice. Thank you so much for the post.
Awesome creativity & the design is also nice. Thanks for sharing.
Awesome post, Thanks for your great sharing.
i couldnt download from the link
can anyone send me the file? @ smithadamari@gmail.com
i couldnt download it even after subscribe to newsletter.
can anyone send me the file? @ smithadamari@gmail.com
You seem to be ignoring Adamari Smith (Until you told him to check his junk file, which I did too and there’s nothing in there). I don’t really understand why I should subscribe to your mailing list to not get the freebie I was told I would receive, or why there is no way to register! It is very confusing.
@ashleypeacocke:disqus check your spam / promotions tab. I just checked MailChimp and your email containing the freebie has definitely been sent – https://www.dropbox.com/s/ex6d1mrob3umxzi/Screenshot%202017-08-22%2020.22.45.png?dl=0
All emails are sent all of the time.
Got lot of information on how to use freebie in successful way. Thanks Mr. Adam for sharing the nice resources.
Thanks for sharing, Very good designer text.
You seem to be ignoring Adamari Smith (Until you told him to check his junk file, which I did too and there’s nothing in there). I don’t really understand why I should subscribe to your mailing list to not get the freebie I was told I would receive, or why there is no way to register! It is very confusing.
Adam, I also filled in my email and tried to register in order to download the Candy text effect. I’ve gotten no email response from you in order to do so. I see (below) others have also had this problem. TIA, Dave
I love this freebie,Thanks for sharing nice images
Why I cant downloud, I am already send my email?
Thanks for sharing. but i think it’s only perfect for beginners.
Why I can‘t downloud?
Post is excellent with plenty of practical advice.
Adam, your design are really awesome….
Photoshop is a very interesting tool to convert 3D text. You share helpful material for me.
Love this freebie,thanks for this types of special post
Thank you very much. It looks excellent.
cool!! freebie!! thanks man for this thing 😀
Hello Adam,Thanks for your helpful post.But the download option isn’t working
Editing fonts is difficult different type of fonts needs different thinking, so here needs lots of creativity work but in this section this tool made easy for design fonts. And here preview text is very nice. very nice thing yo shared with us man. But the thing is download is not working, can you fix it please.
Check your spam 🙂
I am loving these 3D text. And it’s working so nicely.
Cool freebie!
thank’s for share your beautiful post.
This is a most important blog and it’s very helpful for us . Thanks for sharing .
Thanks for sharing this awesome post. I like this post.
Great sharing this post. Your post useful for me.
Yes, it works. Very informative and helpful writing. Looking for the next one.
freebies was love it really good to that
i using to that.
Great freebies! thanks a lot for sharing with us.
Thanks for sharing. but i think it’s only perfect for beginners.
Very well written .Really creative work done.Thanks for sharing such a helpful post.
can you share the file please?
thanks for the tips. I really appreciate it. Very honestly I have never seen so easy steps before like this. I will implement your tips and make a 3d text psd as you say. thanks again.
Wow! I am enjoyed your article. Your tips really helpful. Thanks a lot for sharing.
Thank you for sharing this. “Double click the small icon you see on the layer thumbnail, OR right-click the Edit me layer and select Edit content”